
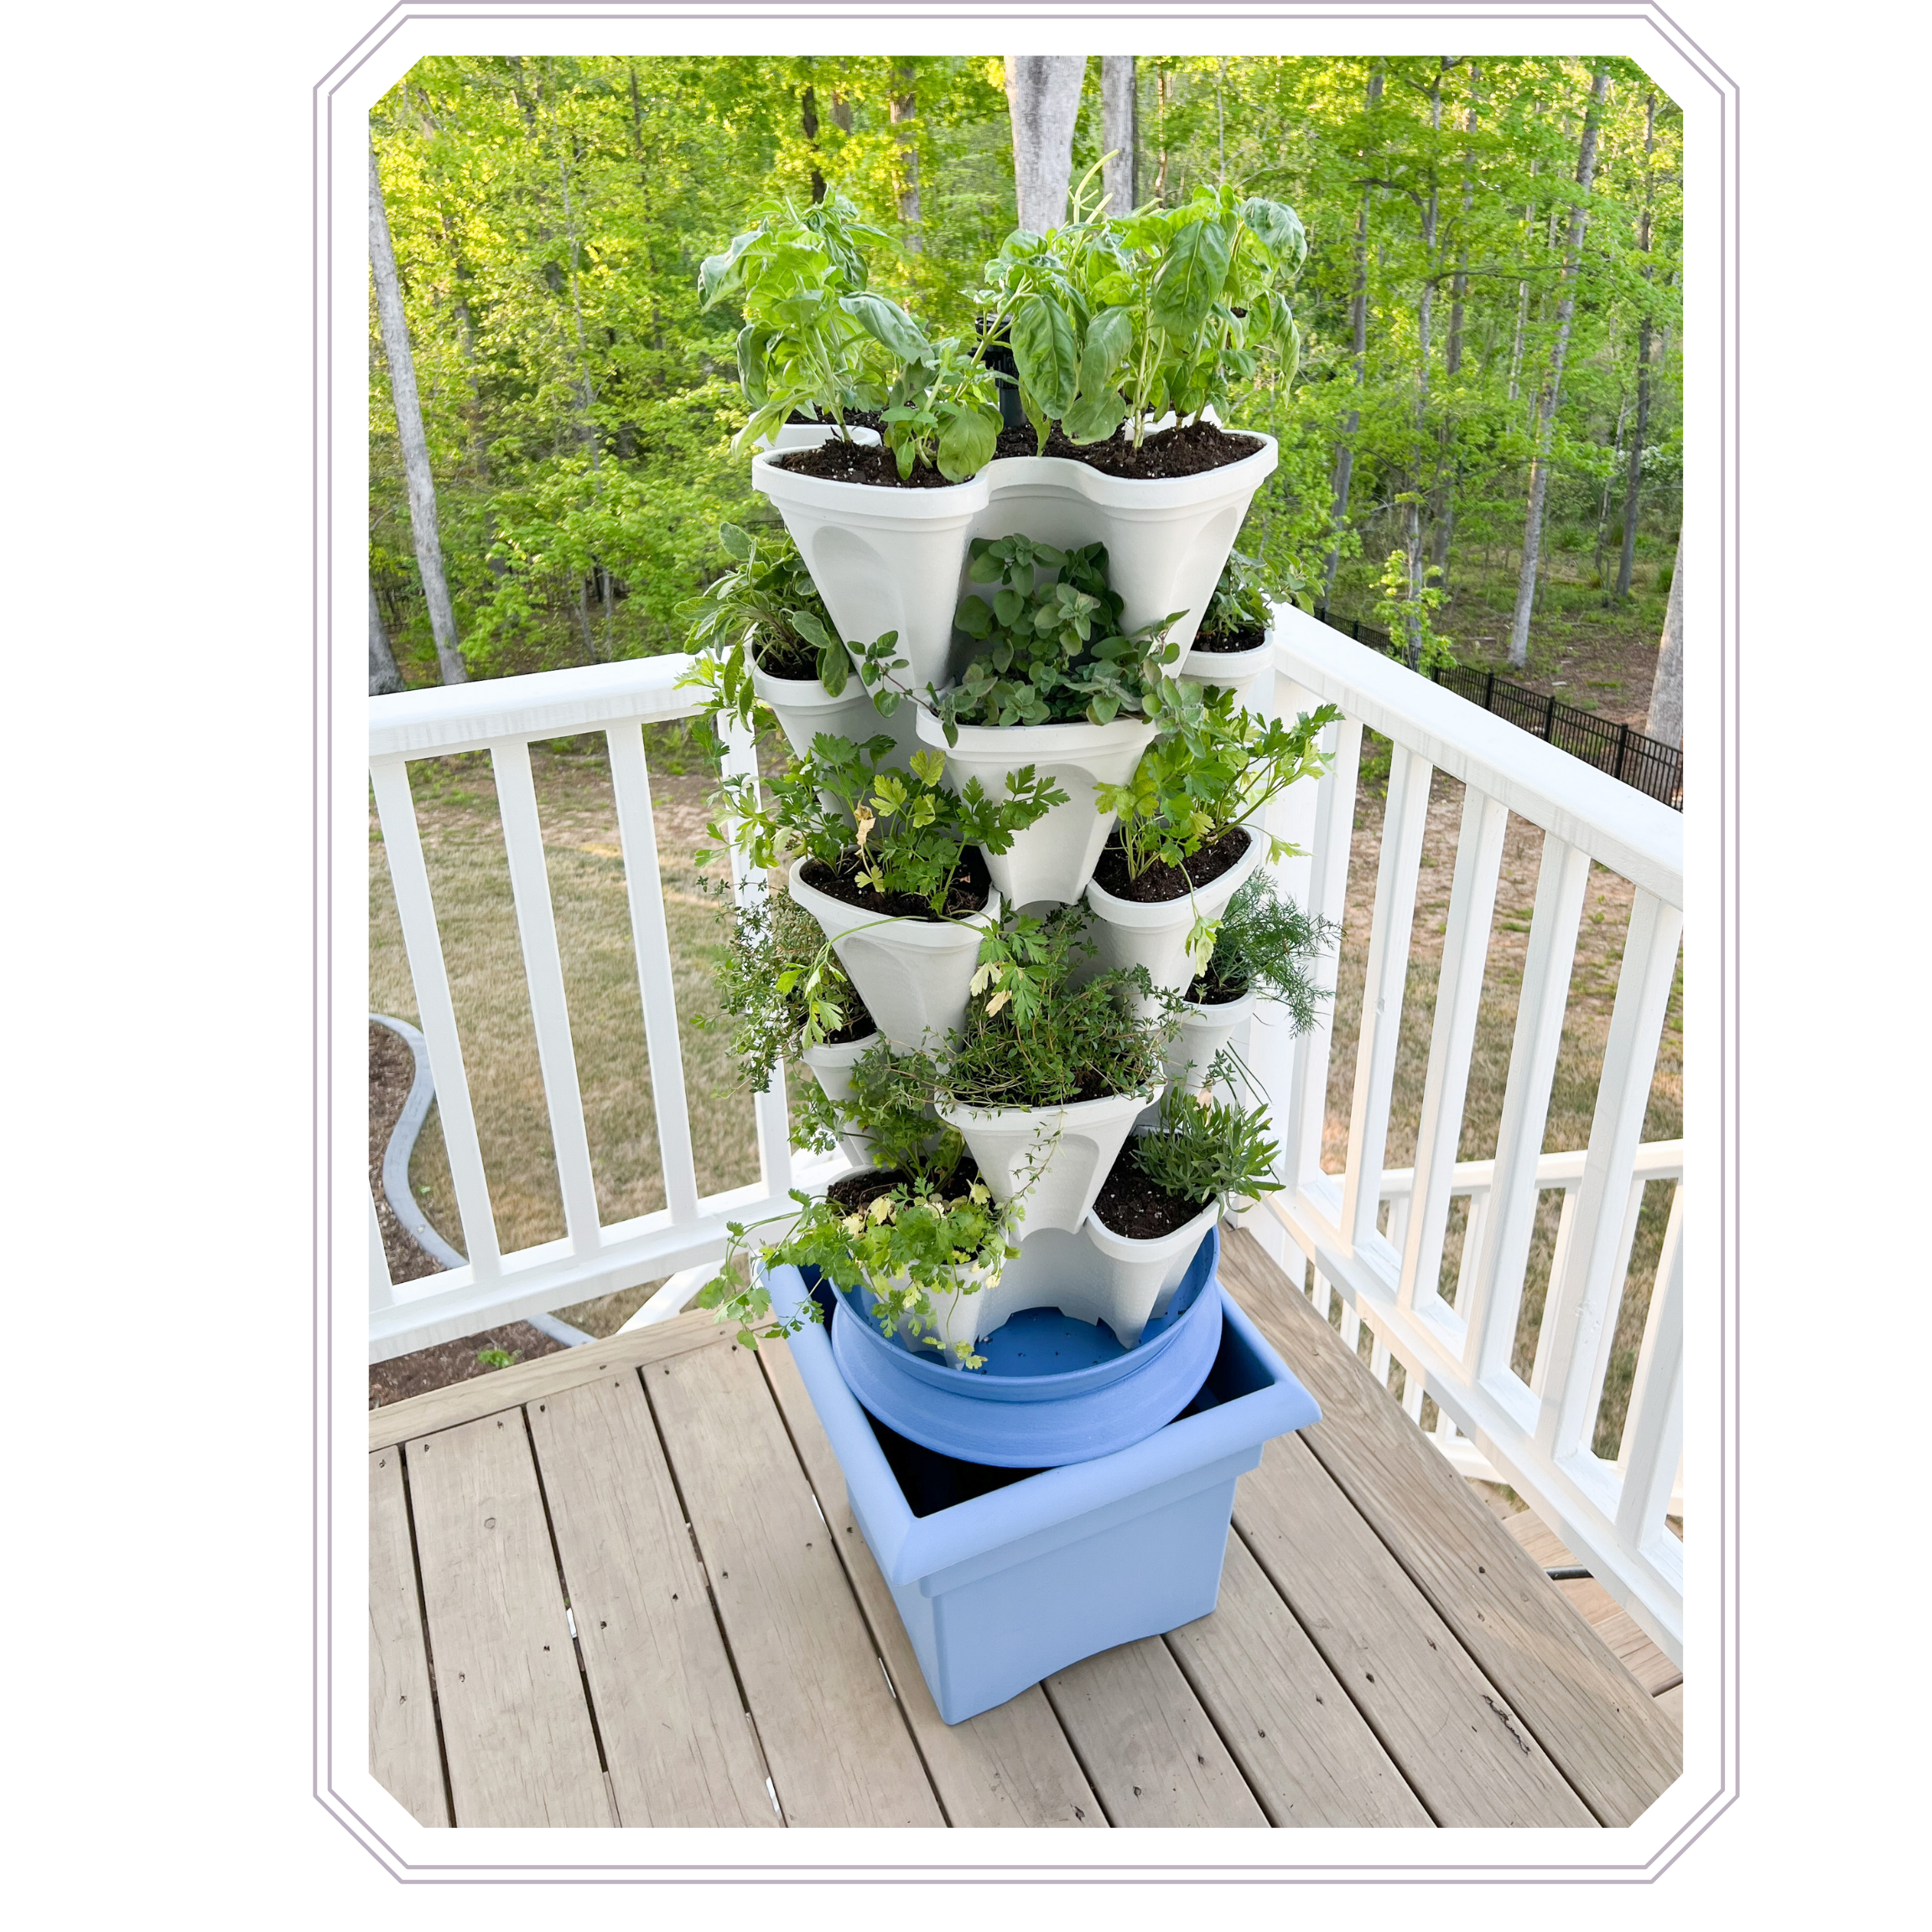
HOW TO: Build Your Own Self Watering Herb Tower!
GET EXCITED!!!!!!!!!! i’m so beyond thrilled to finally be writing this blog post and sharing all the details and super easy instructions on how to make your own self-watering herb or vegetable tower!
A little background on how I came up with this idea:
5 years ago I had spent weeks and months researching all the growing systems out there so I could have delicious fresh herbs right at my house. I looked into indoor options but just wasn’t in love with several risky aspects and the fact that I would always have to have a grow lamp on it. So I focused my research on outdoor systems BUT they were all at-least $500 bucks and usually more. To me I just couldn’t justify that cost and we lived in a townhome with a tiny section of concrete patio out back and I wanted to be able to take this system with us where ever we moved!
So I started looking into each component individually and realized I could probably recreate this myself :) so with a little trial and error my first herb tower was built in 2017! And the best part is that I set it up so it would automatically water itself twice a day every day and I only had to remember to fill up the pot once a week - thats the best and so perfect for my forgetfulness lol! So many of my friends and neighbors were excited for me and the herb tower received so many compliments! We loved it so much that the following year we bought a second system and grew a bunch of vegetables that one! it was incredible! Ive had the same 2 systems since 2017 and the only parts I’ve had to replace is one tier that accidentally got dropped and cracked and a new pump last year! not bad at all!
In this blog post I’m listing out all the supplies needed and 95% of the supplies I purchased directly from Lowes Home Improvement and did a quick online order pickup in-store! I included exact instructions on how to prep the components (prep is only needed your first year setting it up) and full assembly step by step details with coordinating visuals! I hope I’ve made it so incredibly easy! My wish for you is that you find this to be as much fun as I’ve had over the years and you grow an abundance of beautiful healthy fresh produce with the convenience of not having to water every day!
affiliate links are included in this post :)
i’ve included 3 ways to shop for this tower:
You can click the buying guide photo below and it will take you directly to my LikeToKnow.It account where all the direct links are in one location
You can scroll past the photo below and you will find direct links to each item right here in this blog post
You can go directly in store to Lowes for all the items (except the stacker tiers from Amazon). To make this super easy I’ve included the Lowes item and model number for each item
Another question you might have is how much does this system cost? For everything listed below the total before tax is $245. However, most people may have an outdoor timer tucked away in storage that they use for Christmas lights. If you do, go grab yours and pull it out for the spring/summer and that will bring your total down to $218 before taxes which is incredible! Prices in Lowes and sales tax might vary state to state!

shopping list
ORBIT BARBED X 1/2-IN FNPT FLEX PIPE COUPLING (Lowes Item #167200 Model #38413)
QUANTITY NEEDED: 1
SMARTPOND LOW WATER SHUT-OFF 300-GPH SUBMERSIBLE FOUNTAIN PUMP (Lowes Item #2566877 Model #84577)
QUANTITY NEEDED:1
15-IN BLACK PLASTIC PLANT SAUCER (Lowes Item #485112 Model #MLR0816TN)
QUANTITY NEEDED:2
1/4-IN x 30-FT DRIP IRRIGATION DISTRIBUTION TUBING (Lowes Item #44215 Model #MLT-B30)
QUANTITY NEEDED: 1
BLACK POND PUMP FILTER BOX (Lowes Item #60024 Model #52281)
QUANTITY NEEDED: 1
15-IN H x 11.8-IN W BLACK INDOOR/OUTDOOR ROUND STEEL PLANT STAND (Lowes Item #606028 Model #LWP045)
QUANTITY NEEDED: 1
EXTRA LARGE (65+QUART) 17.75-IN W x 14-IN H BLACK PLASTIC PLANTER (Lowes Item #127063 Model #SP1810BK)
QUANTITY NEEDED: 1
9-PORT PIPE THREAD IRRIGATION MANIFOLD (Lowes Item #1642211 Model #MANIFPR9SX)
QUANTITY NEEDED: 1
ORBIT 1/2-IN x 1/2-IN DIA 48” RISER PVC FITTING (Lowes Item #196829 Model #38144P) *make sure it is 48” long, the website doesn’t display length*
QUANTITY NEEDED: 1
OUTDOOR DIGITAL TIMER 2-OUTLET PLUG-IN COUNTDOWN LIGHTING TIMER (Lowes Item #877331 Model #26898-T5)
QUANTITY NEEDED: 1
18” LARGE 64-QUART STACKABLE PLANTER 5-PACK (From Amazon, make sure you are getting the larger 18” version only!!)
QUANTITY NEEDED: 1 5-PACK
Extra links needed if you wanted the blue base color:
You will need the spray paint to customize the color of the plant saucers, rubber risers to lift the metal plant stand up just a bit and the blue pot is linked directly below!
MEDIUM (8-25-QUART) 18-IN W x 14.25-IN H BLUE RECYCLED PLASTIC PLANTER (Lowes Item #3846384 Model #VER1871-OS
RUSTOLEUM 327936 AMERICAN SPRAY PAINT, 12 OUNCE (PACK OF 1), SATIN WILDFLOWER BLUE
RUSTOLEUM AMERICAN SPRAY PAINT, 12 OUNCE (PACK OF 6), SATIN WILDFLOWER BLUE
INVISIBLE PLANT RISERS FOR MEDIUM AND LARGE SIZE HEAVY POTS - 3/4" ELEVATORS
INVISIBLE PLANT RISERS FOR MEDIUM AND LARGE SIZE HEAVY POTS
assembly directions
(4 phases)

Phase 1: Let’s Prep Your Components!
Tools needed: You will need an electric drill and a drill bit around the size of 5/32 or as small as 9/64
For your two plant saucers: these saucers prevent dirt that drains down through the tiers from getting into your bottom pot and seizing the pump motor! So this portion of the drainage is really important. You truly can’t have too many holes! Don’t attempt to align the holes in the same spot as the other saucer, you want them to be different, this will help block dirt from making its way through and only allow the water.
So with a smaller drill bit, I went through a drilled a bunch of holes throughout. I used a size 5/32 drill bit but there’s some wiggle room up or down on the size of bit you use. Just take your time when drilling the holes, it’s easy to crack the saucer if you push too hard. Let the drill bit do the work. For the center hole, if you have an extra large bit or a circle cutting tool, by all means use those. I didn’t so I just used the same drill bit and drilled a bunch of holes in a circle of about 1/2” thick and punch that circle out. It doesn’t look perfect but you won’t even see it!
For the 5 stacking tiers, it’s really important that these drain well. They definitely don’t need as many holes as the saucers (you don’t want too much of the soil leaking out) but anywhere where water could collect, go ahead and add some drainage holes. There needs to be drainage on the tips of each section. This is super important in making sure every subsequent layer under each other gets water as well. These tiers already come with a pre-drilled center hole so that’s easy!
And lastly, for the pump filter box. Trust me, you NEED this box! without this box, any sediment that makes it’s way into the bottom reservoir will instantly seize the motor. I’ve tried other options like a mesh bag around it and nothing else works. This filter box is already perforated on the lid and that may be fine if you were using it in a deep pond that stays full but you’ll be refilling the bottom pot once a week and so you don’t want your pump to turn itself off when the pot is still halfway full. So to avoid this, make sure to include drainage holes all the way around the filter box about 1/2” from the bottom on all four sides. This will allow the water to continue to get in. When setting up the filter box, do follow the instructions that come with and don’t leave out any of the internal mesh and foam elements. Those are very important for protecting the motor from dirt!
*If you are going with the blue & white color combination: after your drill the holes on the plant saucers, spray paint 2 coats on top and bottom of each saucer to achieve that coordinating color combo! This is is the same if you are doing your own favorite color combination like olive green or something fun!

Phase 2: Assembling The Inner Components
Start by following the instructions for the filter box to open it up and take all the pieces out. Next, you are going to screw on the small black coupling piece and then screw on the 48” long riser PVC pole.
Then you are going to put the pump into the filter box. I move the filter balls around so the pump suctions to the bottom of the box and then place the balls around it. Then you will layer the two pieces of foam according to the box’s directions and cap the box off with the lid. So easy!
Next, you will place the filter box components down into your base pot and then layer over top the metal plant stand (make sure to keep everything centered) and then your two plant saucers on next. You will want the first saucer to have the opening facing down and the second one to be facing up. This ensures that sediment is caught from the tiers and prevents as much as possible from it getting down into the base reservoir pot.
If you are using ANY reservoir pot other than the black one linked, you will need to insert your rubber pot risers under your metal plant stand. So for all my friends who are going with the blue pot or using one they already have from home, make sure your metal stand pops out of the base pot by about 2 inches for clearance.
After assembling this step, put a 4-5 inches of water in your pot and turn it on! You definitely want to double check that everything is hooked up correctly before you start planting away :)

Phase 3: Let’s Plant!
This is the fun part: planting your herbs and vegetables! With this step, TRUST ME, plant as you go! Start with the first tier and add your soil and plants.
In total, I used about 2 27.53 L bags of soil to fully plant 1 tower. And then you have 20 total sections that stick out for you to plant away in! When you get to the top tier, be very careful not to spill any soil down into the pipe. To avoid this I went ahead and screwed on the manifold to block the opening.
Another thing to note, when placing the next tier on, just make sure you don’t squish your plants from the previous tier.

Final Phase 4: Hooking Up The Water
Now that your entire tower is planted and ready to go, the last step in the process is making sure water is distributed to each tier and level correctly! To do this, we need water making it’s way to all 4 sections of the top tier directly and all 4 sections of the second tier directly. Then it will drain down from there to the below tiers.
With the irrigation tubing, you are going to attach a section to one of the manifold ports (theres 9 in total, we will be using 8). I went with a 9 port manifold because you can control the intensity and flow of each port independently which is SO important for this to work.
After you attach the tubing to 8 ports, you will trim each section with scissors so they end up about where you planted each plant on your top tier (1-2” from the ends) and then directly above where you planted your plants for the second tier. For the sections that go directly down to the second tier; you have two options. You can let the tube just sit on the ledge of the top tier or you can take a 1/4 drill bit and drill an angled hole at the very top and thread it through. I’ve included a photo below for reference.
To make sure each section is getting the right amount of water, you will go to each Individual port (small black mini levers) and adjust the flow. You want each tube to be a very quick drip, ideally not a constant flow. This will be trial and error. It’s tricky because once you adjust a few, it changes the pressure on the others around it as well. So just play around with this part. I usually have to adjust the port flows a few more times over the next 24 hours and then it should be good to go!
And lastly, don’t forget to hook your herb tower directly up to an outdoor Christmas light timer, TRUST ME, it makes all the difference! I set mine to go off twice a day for a full hour. I choose to do 6am-7am and 5pm-6pm. You want to avoid peak day when the sun is the hottest. If you water your plants peak sun, the sun will fry everything up.
Now sit back and wait for your plant babies to grow grow growwww and don’t forget to refill your pot 1-2 times a week as needed! (typically I only need to do 2x a week in the hot weeks of August)
